When planning a wedding or special event; you want everything to be perfect. You probably feel like you will spend any amount of money it takes to have the perfect day, but you will soon realize that your budget can’t afford that expense. So why not recruit some help from family or friends and spend some time making a few of the items for your wedding or special event? You will have fun and save money at the same time.
One project that can be simple to complete is table numbers that hang from a bottle of wine or sparkling cider. These table numbers are constructed from Mason jar bands and lids, paper, a printer, watercolor paints or scrapbook paper. In this tutorial I will go over a few different ways to complete these fun table numbers. You may also choose to purchase my affordable pre-formatted table numbers as an instant downloads on Etsy (here).
If your not using wedding table numbers you can also use this same idea to provide information to your guests. For example: “We can’t wait to hear your glasses clink, please wait for the toasts to enjoy this drink!” or “Please wait for the wedding toast.”
Some of these options are also available for purchase on Etsy (here).
Here’s the supply list and step-by-step instructions and photos (You can find most of these supplies at Amazon or the Dollar Tree):
Mason Jar Bands and Lids (Wide Mouth or Regular)
Paper of your choice (Printer Paper/Watercolor Paper/Scrapbook Paper)
Step One: If painting on watercolor paper, trace the size of lid you’re using on the watercolor paper, paint with watercolors, let dry and then either brush on your text or table number or write with a sharpie. If using a printed background, print it on your paper. Trace circles of the correct size onto the paper, hand letter your number or text. If using scrapbook paper, trace your circles and write message or table number where desired. If using the instant download, purchase here, download, and print on the paper of you choice.
Step two: Trim circles to correct size.
Step three: Coat lid and backside of circle with Mod Podge and adhere to the Mason jar lid. Then coat the top of the print with Mod Podge and allow it to dry.
Step Four: Tie your twine or ribbon around the Mason jar band as shown.
Step Five: Once dry, heat up your hot glue gun and run a line of hot glue around the inside of the Mason jar band as shown above. Then quickly place your Mason jar lid into the ring picture side down and press until hot glue cools
Step Six: Make hot glue “tab” on the backside of the band and lid as shown here to make sure your lid stays in place. Let hot glue cool. Remove glue strands, if any hanging from the finished piece.
Step Seven: Hang your creation from wine or sparkling beverage bottles as shown. You’re done!
Wow! Wasn’t that simple. It didn’t take much time, you saved money and it added a personal handmade touch to your wedding! I would love to see photos of how you used this project at your event or wedding!
Sign up for our product updates and special offers at our Etsy Shop here.
Hot off the presses:
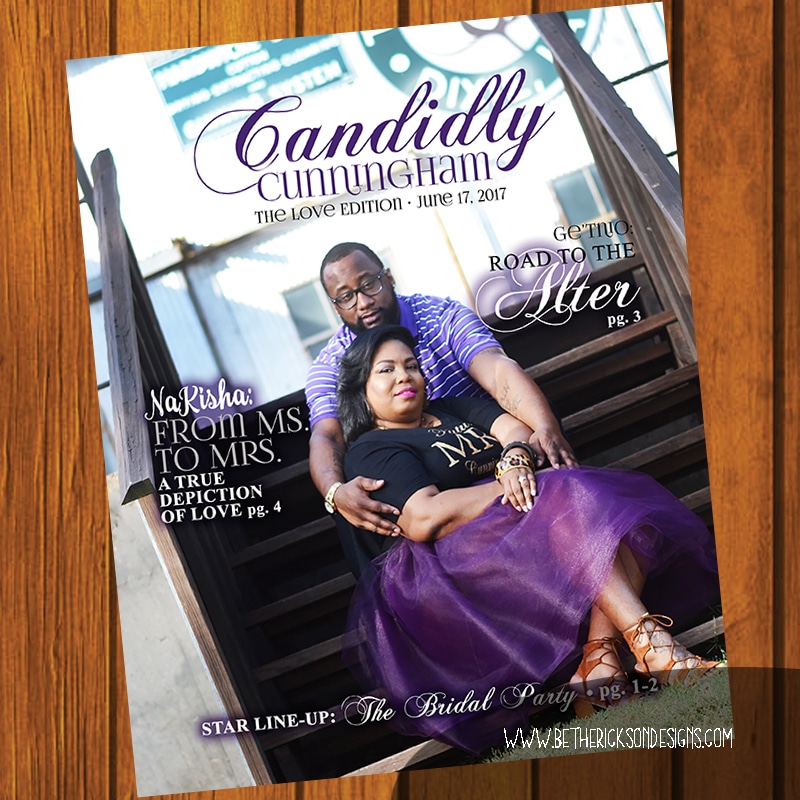
Your wedding program as a magazine!
Have you ever thought of having a magazine created for your wedding?
Recently, one of my clients asked me to create a magazine for the wedding she was coordinating. As she started sending me the information and the content for the magazine I started to get really excited about this project. What a perfect way to let your guests know a little bit more of your story, along with information about the bridal party, order of service and much more!
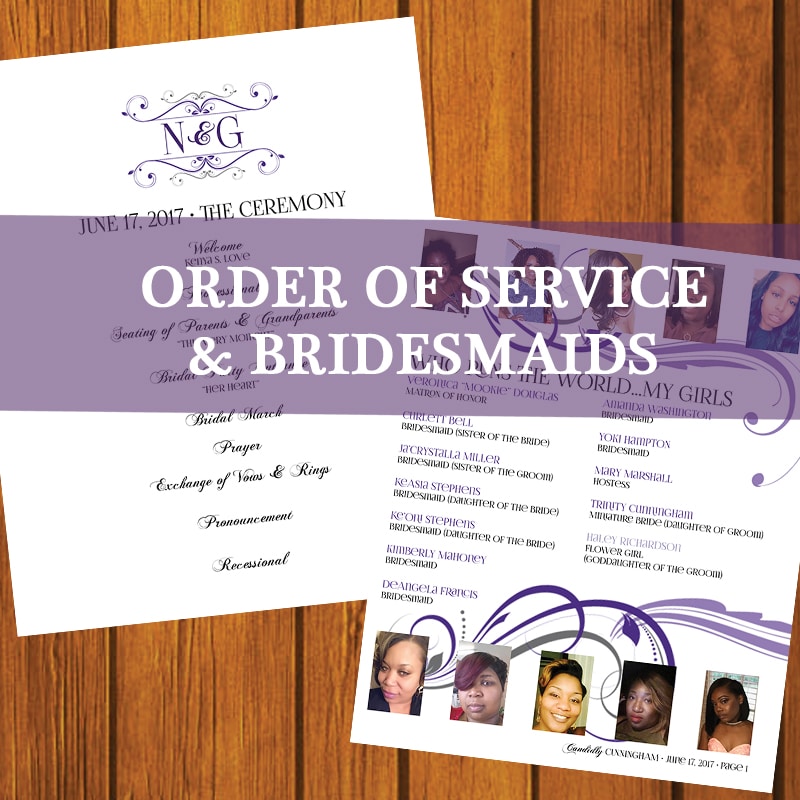
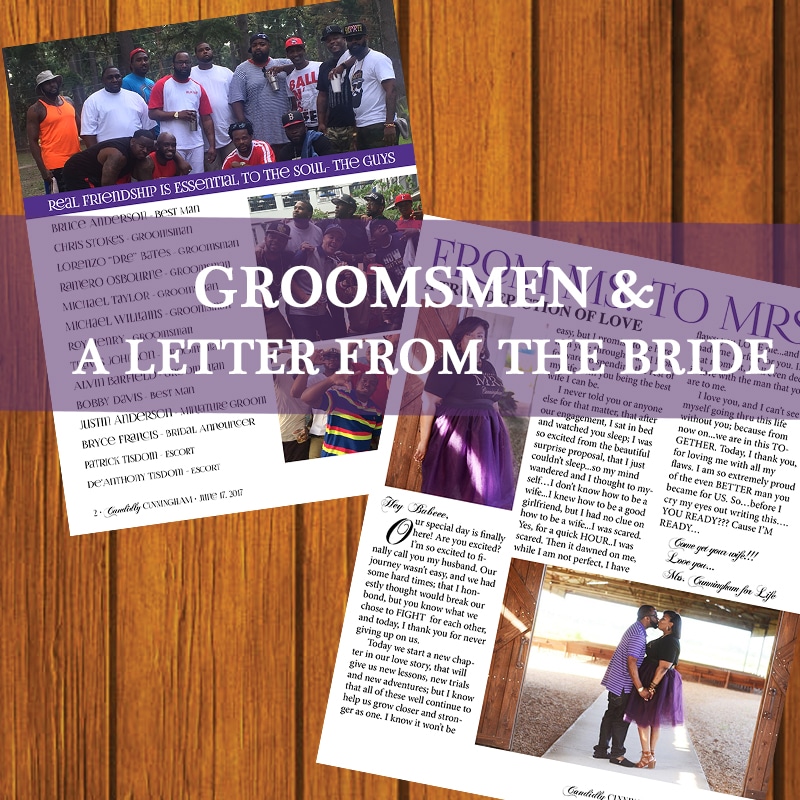
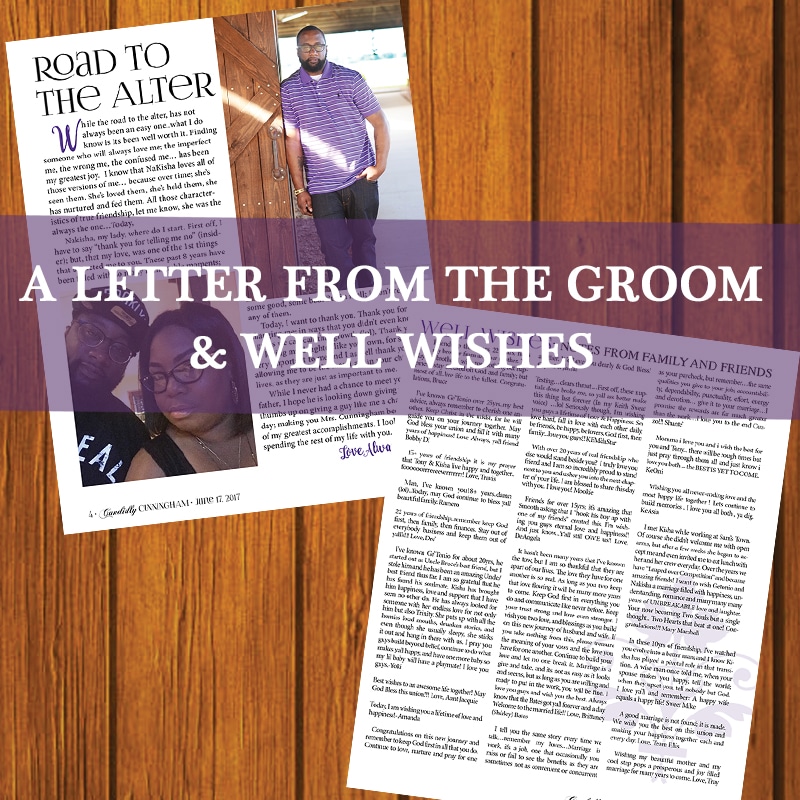
The project began with one of the couples engagement photos, a magazine title and headlines and continued with the order of service, the bridal party line up with creative headlines from the bride and groom, letters written by both the bride and groom to each other, well wishes from family and friends, a dedication to a deceased friend and thanks to all those involved in making their day special. Just 8 pages long, but packed full of wonderful memories for the couple and their guests!
A magazine like this would allow your guests to prepare themselves for your story and what is about to take place as they wait for your wedding celebration to begin. It could contain notes from your bridal party or notes to each member of your bridal party, vows written by the bride and groom, blessings or prayers from the parents, information about where the new couple is going to live or where they are taking their honeymoon. It could be 4 pages, 8 pages or 12 pages long! Really the sky is the limit with something like this!
Interested in having a mini magazine created for your wedding! Contact me at www.bethericksondesigns.com for more information! I look forward to helping you create memories for special day!
Unique Wedding Guest Books
Traditional guests books can feel boring and outdated. Many brides and grooms wonder, what are we going to do with a book full of signatures after our wedding? Will we even look at it again?
In recent years, wedding designers, planners and couples themselves have come up with many creative guest books that are unique, interesting and more valuable to the bride and groom after their wedding than the traditional guest book.
There are guest books that can be used to decorate your first home together. They can be used in the kitchen, provide personalized wisdom for your first year of marriage or hold memories beyond just the names of your guests.
Lets start with guest books that decorate your home for years to come and remind you of that special day each time you look at them. Here are just four ideas, but I came across many more in my search to bring you the best home décor guest books:
Wisdom, Advice & Well Wishes • Print these cards at home or your local print shop and purchase a box, basket, large glass jar or unique container to hold them after your guests fill them out. These will be fun to re-read in years to come. Beth Ann Erickson Designs
Memory Cards, same idea as above, but ask your guests to share with you and your spouse a memory they have of one of you or both of you. Beth Ann Erickson Designs
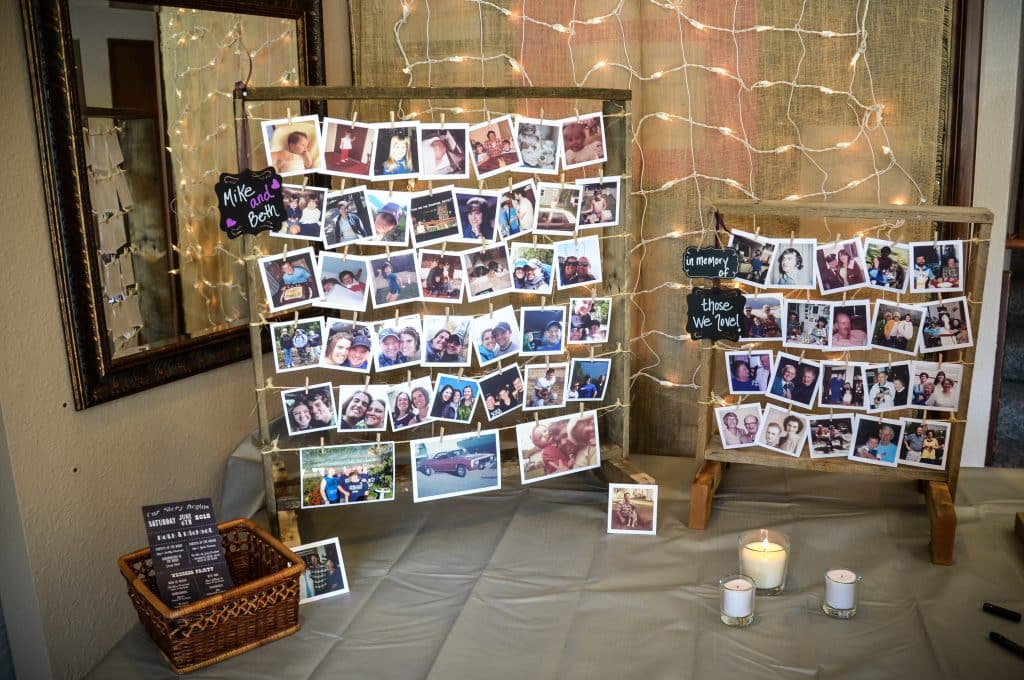
Photo Guest Books:
Polaroid guest books are very popular right now, as the Fuji Instax Mini Polaroid camera has just recently come on the photography scene. You can buy film for these cameras that have a space under the photo for your guests to sign their names or write you a special note. You can find film with white borders or a selection of colored or patterned borders. Once you have the camera and the film of your choice you just have to decide what you want the guests to do with the photos they take. You could provide a blank memory book, glue or tap and have the guest stick them in a book for you. Another option is to have a place for the guest to display their photos through out the reception. (As shown below.) This type of guest books provides you with photos of all of your guests that you can enjoy for years to come.
Cookbook Guest Books
This one is very easy to accomplish. Purchase one to three cook books you would use in your kitchen and have a sign made that asks your guests to leave a note next to a recipe they think you should try. Then through out the years when you’re using your cookbooks or looking for new recipes you will happen upon the notes. Not only do these create wonderful memories they are also very useful.
Some advice about guest books:
Much of the time guest books are over-looked by the guests and by the end of the wedding they don’t contain as many signatures, notes, photos or memories as youhoped. To make sure a majority of your guests sign or participate in your guest book, its best to have a friend or relative take charge of the guest book area. Ask them to collect presents and then request that the guests participate in the guest book. This will result in a more accurate accounting of who attended your wedding.
There are so many creative guest book ideas that I have barely scratched the surface. I hope this helps you to start thinking about what creative ways you can capture your wedding day and all of your family and friends who have taken the time to celebrate with you.
Visit my website www.bethericksondesings.com for more creative ideas, wedding, birthday, anniversary and graduation invitation designs and more! Feel free to contact me anytime for help with your next event!
Budget Friendly Fall Wedding Ideas
Hello Fall! Yes, I know it may not be autumn right now, but autumn is always just around the corner, and with it comes bright fall colors, changing leaves, cooler evenings, pumpkin-flavored everything, and of course fall weddings, and if you are planning a fall wedding, you will be looking for inspiration right now.
The idea of a fall wedding makes me smile. Ideas float through my head of pumpkin spice cake, apple and pumpkin pie, jewel-toned decorations in emerald, ruby, amethyst, topaz, sapphire, gold and silver, paper leaves, and the smells of Thanksgiving! So how does someone accomplish a fall wedding in a budget-friendly way? Let me supply you with a few tips and tricks that should help.
Color Theme:
The start to any beautiful wedding day is to choose a color theme that you love! For a fall wedding, I would suggest incorporating Gold or Silver and jewel-toned fall colors that represent you. A wedding can be any color combination that you dream of and as long as you stick to shades of your chosen colors, they will blend well together. You don't have to worry about them matching perfectly. I would suggest having one or two primary colors and a third color to use as an accent to the main colors. Some color combination ideas would be gold, topaz and emerald or silver, ruby, and sapphire. Don't let these two ideas limit you, as there are many color combinations that could be used. After choosing your color combinations the next step is to think about your invitations.
Invitations:
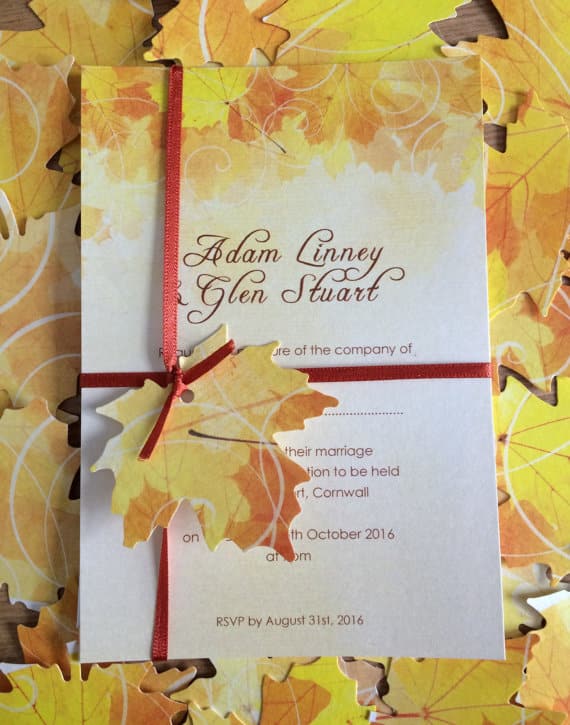
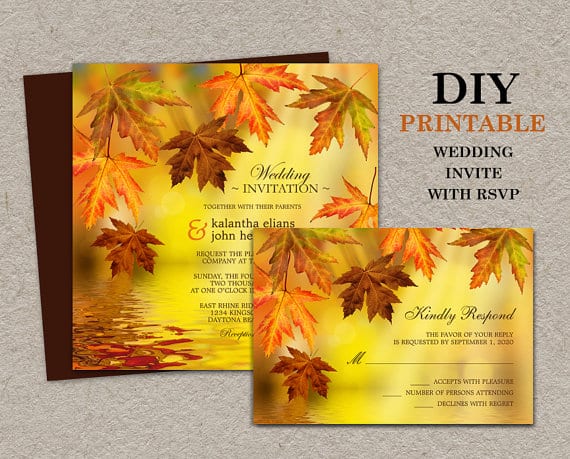
Invitations set the tone of your wedding and should be chosen early in the planning process so that decorations, coordinating signs, and printed items can be designed to match. One of the best ways to save money on your invitations is to stay away from high-priced invitation companies and look to smaller privately-owned companies. These can be found on Etsy or in your local phonebook. Once on Etsy, just search for DIY Fall Wedding invitations and you will find so many designs to choose from or just visit my SHOP page right here to view all my wedding invitation designs. Any of my designs can be adapted to your chose wedding theme and colors.
One of the great things about invitations from Etsy is easy communication with the designer, being able to customize wording and color (on most invitations). It's wonderful to work with a small shop that truly cares about your special day and providing you with the invitation of your dreams. You will also save time and money by being able to order your invitations from the comfort of your home and choosing your print options, such as printing at home or through a local print shop. In most cases means you will spend less on your invitations than you would from a boutique stationery store.
Decorations:
Now that we have the colors chosen and the invitations were taken care of, it's time to move on to the decorations! Decorations for your wedding don't have to be elaborate to make an impact. They can be made at home quickly and easily and still set the mood for your special day in a beautiful and simplistic way.
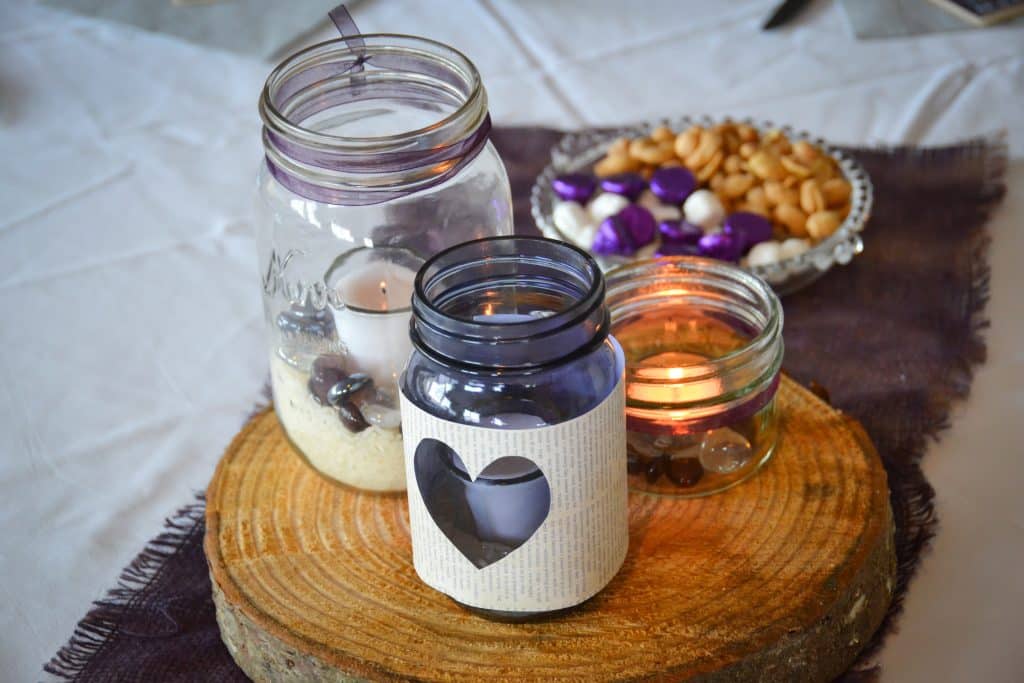
One idea that comes to mind is, is using leaves on the top of tables to bring the feeling of fall and to add pops of natural fall colors. The most budget-friendly way to do this is to collect leaves and coat them with Mod Podge to preserve them. (Instructions below) Then I would use these preserved leaves on top of a white, silver, gold or jewel-toned table cloth, with Mason jar candle holders and a fall scented or battery-powered tea light.
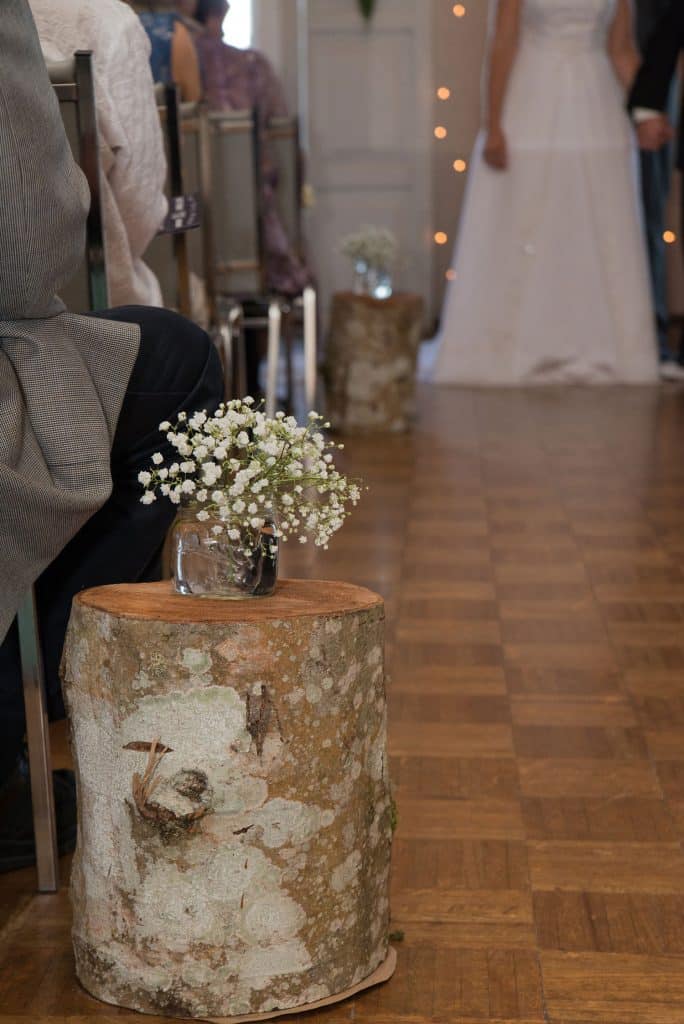
Another great addition to fall wedding décor is wood rounds (as seen above). These can be purchased from your local craft store or collected from family and friends who have fallen trees on their property. Wood rounds add height and dimension to your centerpieces allowing you to display candles, flowers, or dishes of food.
Arrangements of pumpkins and gourds next to your candles will also add a wonderful fall feeling to your wedding. These can be found at local farms, grocery stores, or craft stores.
I could go on and on as I have many more decorating ideas. If you need more suggestions or help to complete an idea you have, please feel free to contact me. Good luck with your fall wedding!
Step 1: Gather leaves either from the ground or straight from the tree. Select vibrantly colored leaves that are somewhat dry but not brittle.
Step 2: If your leaves are still very green and moist, place them between two paper towels under a heavy book for a few days so that they dry a bit but are not brittle. If you don't need to dry them, move on to step three.
Step 3: Using a foam brush to apply decoupage (Mod Podge) to one side of your leaf.
Step 4: Place on newspaper to dry until it turns clear and is no longer sticky.
Step 5: Turn leave over and repeat steps 3 and 4.
Once both sides are done your leaves are ready to use!
Wedding Dreams:
The art of coordinating your wedding theme
This week I thought it would be fun to give brides-to-be some ideas on how to coordinate the theme of their wedding all the way from save the dates, invitations, decorations, hair & make-up, to what to wear. Our theme for the purposes of this blog, will be a rustic wedding. Currently a very popular choice among brides, but sometimes hard to coordinate through-out the entire wedding, but I have some ideas on how to help with that. I am also very excited to introduce Molly of Lovely You By Molly, she will be contributing to the blog with the hair and make-up portion along with some wonderful hair tips for the day of the wedding!
A rustic wedding can be formal-rustic or casual-rustic. So, your first choice would be what direction do you want to take? After choosing your direction, it is then time to look for your save-the-dates and invitations, along with choosing your color combinations. Most people don't realize that your invitations and other printed items can help set the mood for your special day, along with decorations, clothing options, hair and make-up. Its a good idea to use your save-the-dates and invitations to give your guests a small taste of what the day will be like.
What things convey a rustic wedding theme? Well there are quite a few things that do this. Some ideas would be, wood backgrounds, mason jars, lanterns, chalkboards, brick walls, wood rounds, logs, stumps, wildflowers, cowboy boots, jeans and much more.
Save-the-Dates and Invitations
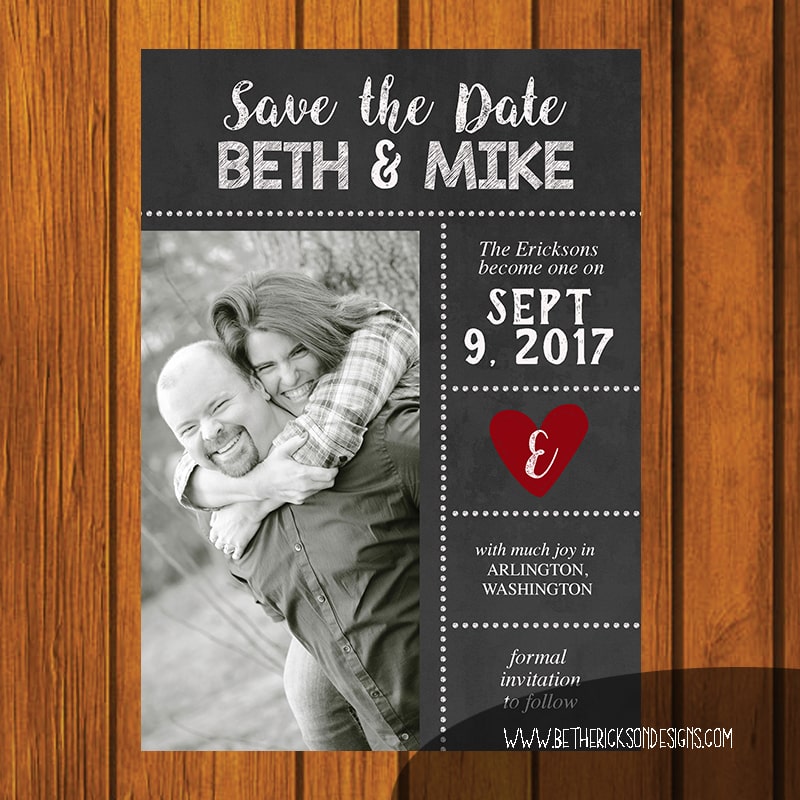
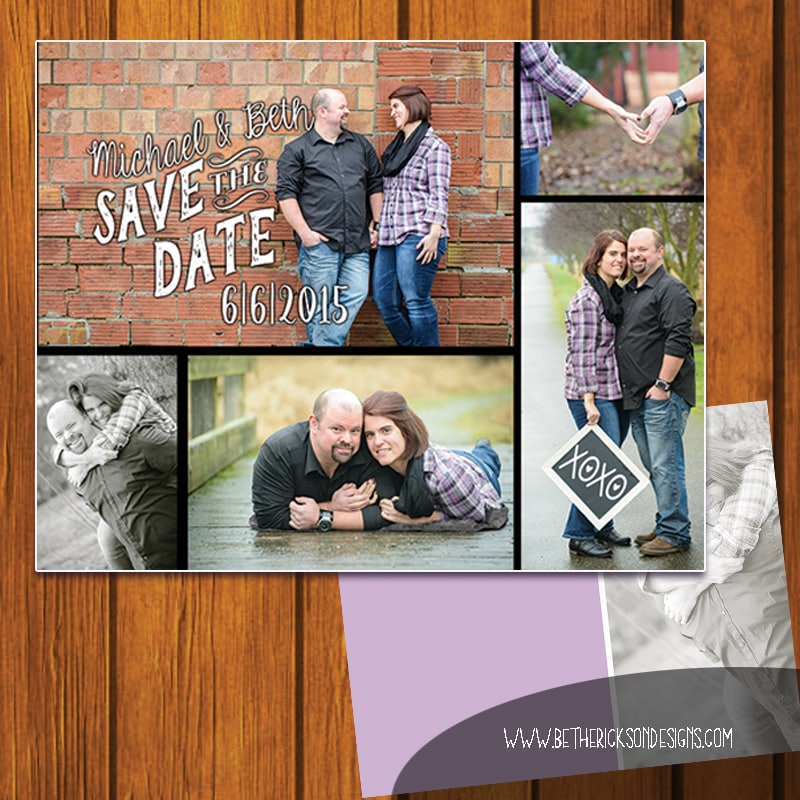
Here are a few examples of rustic save-the-dates and invitation sets. These are available for purchase at www.bethannerickson.etsy.com. As you will see below, these use lots of wood backgrounds and a mix of chalkboard fonts and formal script fonts. There are many more styles to choose from on Etsy and they can be created in any color combination you choose.
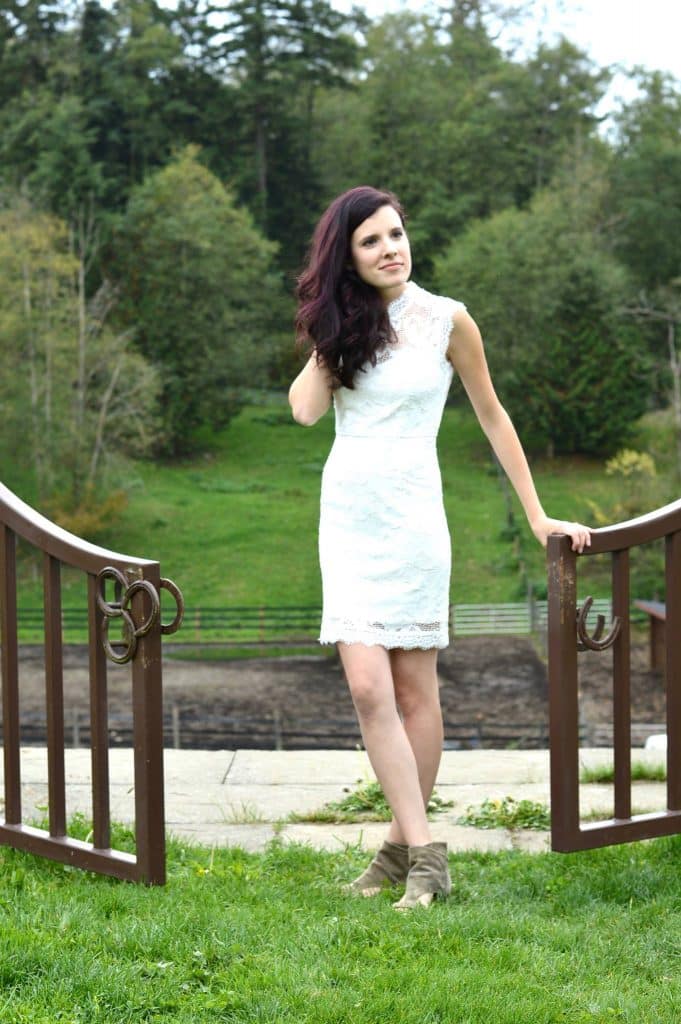
Attire, Hair and Make-Up
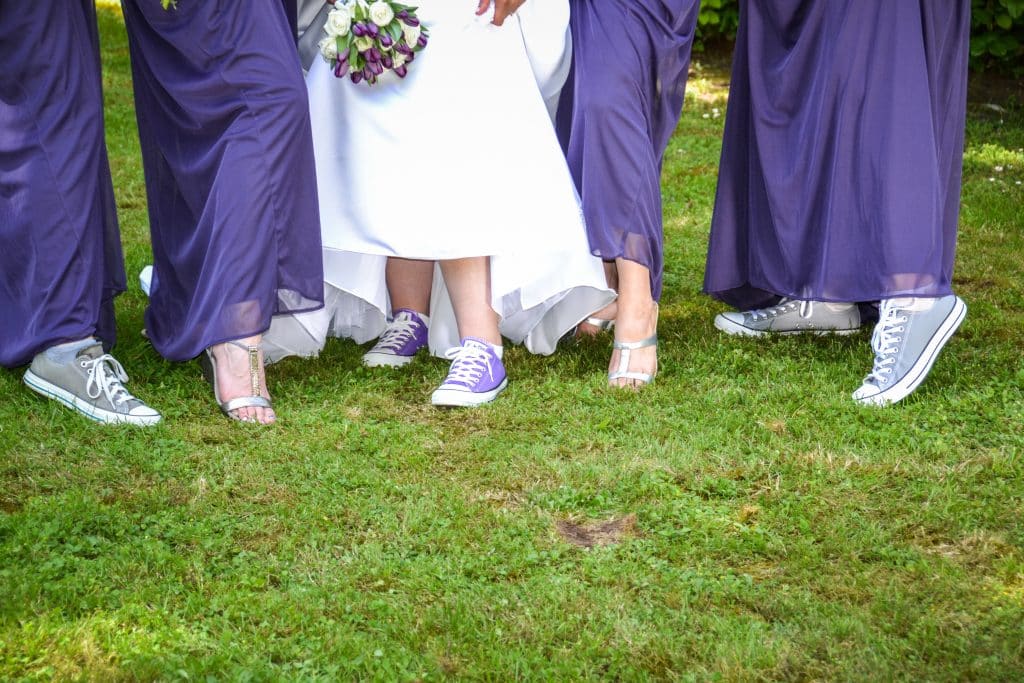
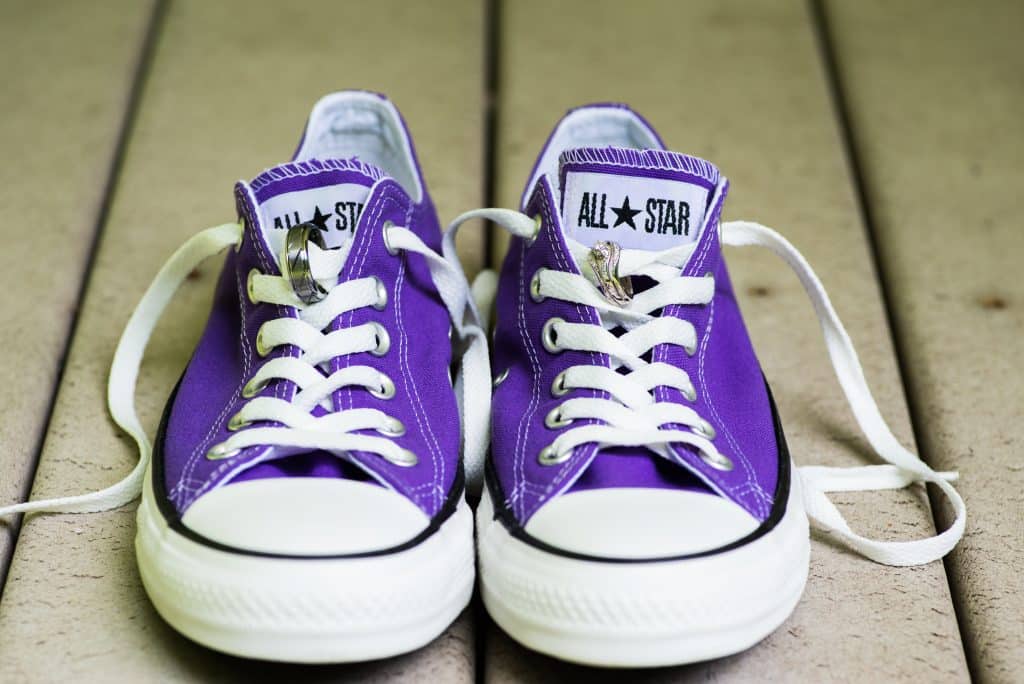
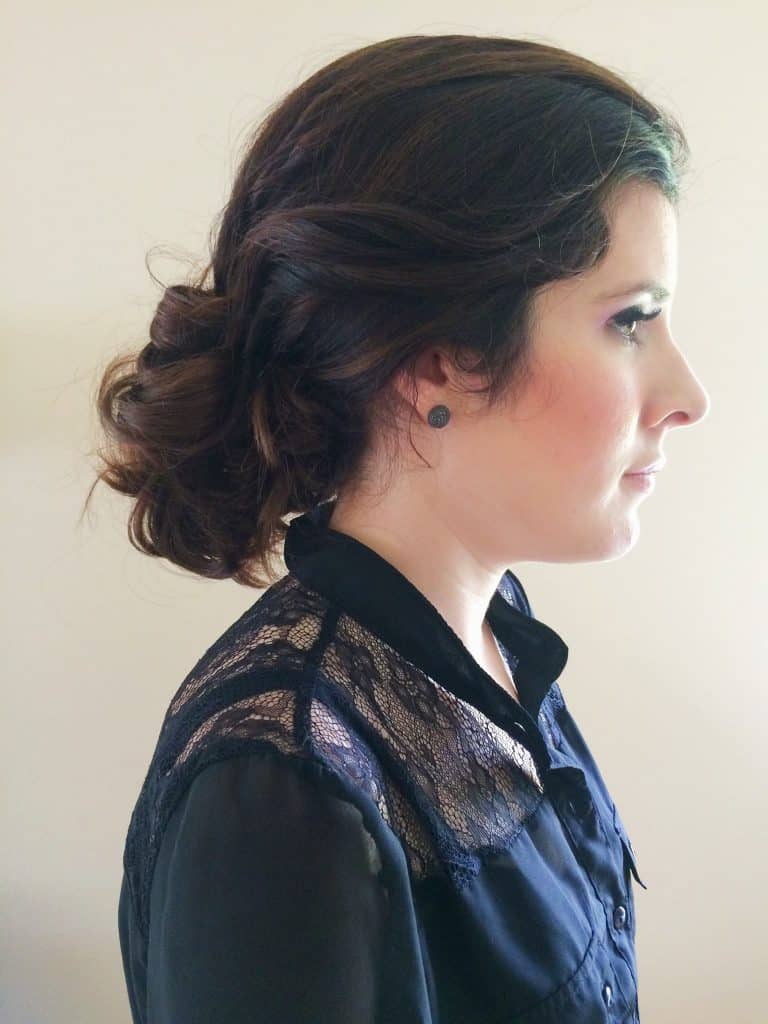
The next step would be choosing what your wedding party will wear on the special day and testing out possible hairstyles and make-up options. Some ideas for rustic attire range from, trendy jeans, dress shirts and cowboy boots for the guys to short/medium length dresses and cowboy boots for the girls if you are choosing the casual side of things. For my own wedding which was a purple and silver wedding with rustic tones, we chose more formal clothing, but wore Converse to bring in the casual side of things. The bride could wear a long or short dress, or a sundress with a choice of casual foot attire. Here are a few pictures to give you some ideas.
Now I will turn the blog over to Molly for the hair and make-up portion, picking back up when she is finished.
Hi Lovelies! My name is Molly and I was pleasantly surprised when Beth asked me share some tips for Brides on how they might incorporate a rustic style in their hair and makeup for their wedding day. Let me share a little bit about myself before we get to the details.
I am a licensed hair stylist and makeup artist for weddings and events. I own my own business called Lovely You by Molly. I have two sweet kids, a 4 year old daughter and a 1 year old son. I own a cleaning business as well but the hair and makeup is definitely my favorite. It is a joy to be a part of someones special day whether it’s their wedding day or headed to prom. I love it when I see a huge smile on a client’s face after they look in the mirror, with the style they have always dreamed of.
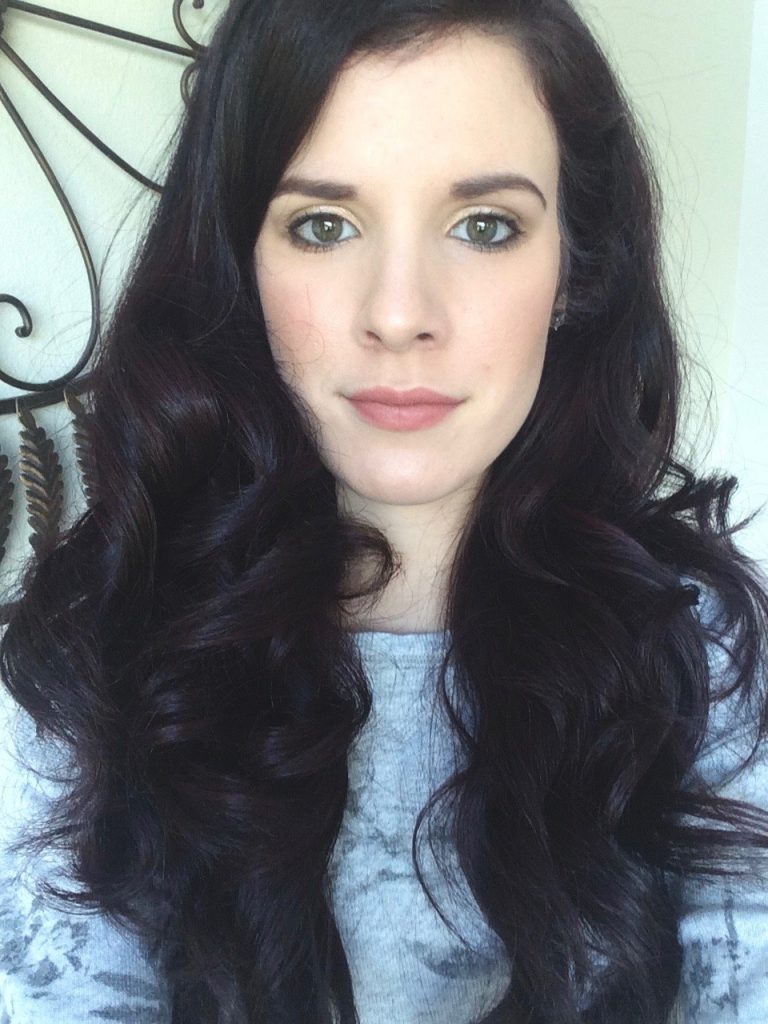
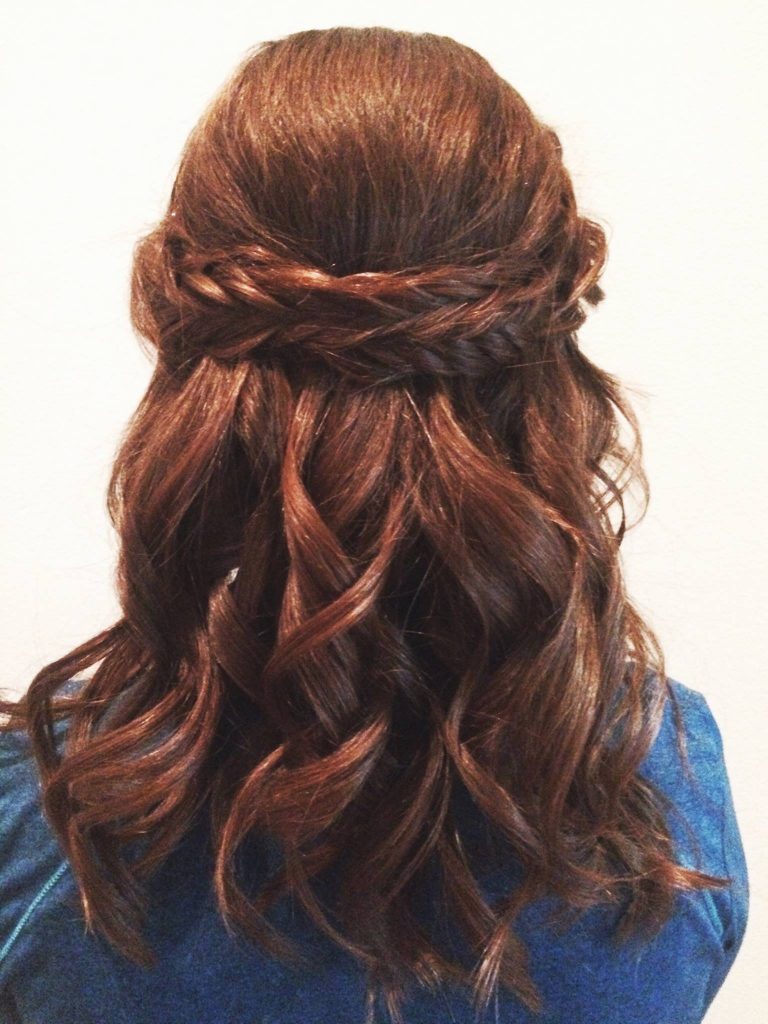
Back to this rustic theme, What are some good looks if you are a bride planning this style of wedding? Words that come to my mind for hair are loose waves, braids, and an effortless look. For makeup, I think of natural, warm tones and a soft look. Here are some photos of some styles I have created to get you thinking. The last one is a combined hair and makeup look on myself:
Lastly, I wanted to share three tips for Brides as the plan their wedding day style:
1. Choose a classic and timeless look. When picking a hair and makeup style, try to always have in the back of your mind, is this something I will be happy looking at a few years from now, as I browse through my wedding photos? Save the trendy looks for a date night or even your engagement photos but on your wedding day, pick a style that reflects the elegance of a bride.
2. Dry Shampoo is your friend. Dry shampoo is a great starting point for any style, to create volume and texture, especially for Brides who have fine hair or tend to get oily. You will be amazed at the difference it makes.
3. Create variety in your curls. When curling your hair, alternate the direction of each curl. You will get more of a natural look doing this. It also helps your hair to not bunch together into “one” big curl as the day progresses.
Thanks for reading and I hope these tips helped you become inspired about a beautiful, rustic wedding theme. Come find me on instagram @lovelyyoubymolly as well as Facebook, www.facebook.com/lovelyyoubymolly. I would love to get in touch!
Thank you Molly for all those wonderful suggestions.
Decorations
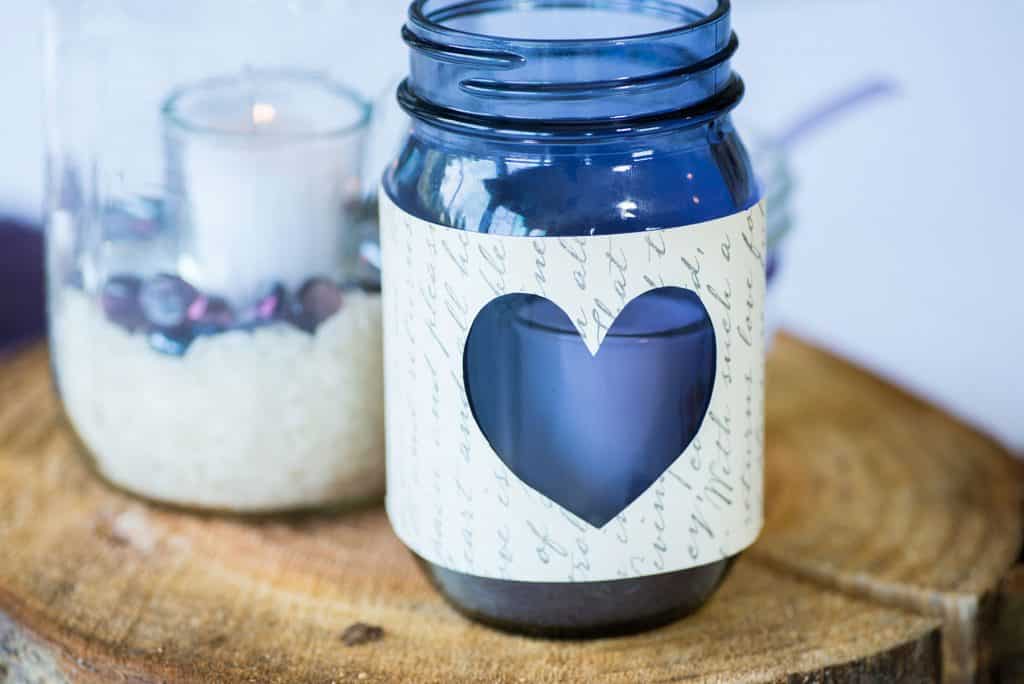
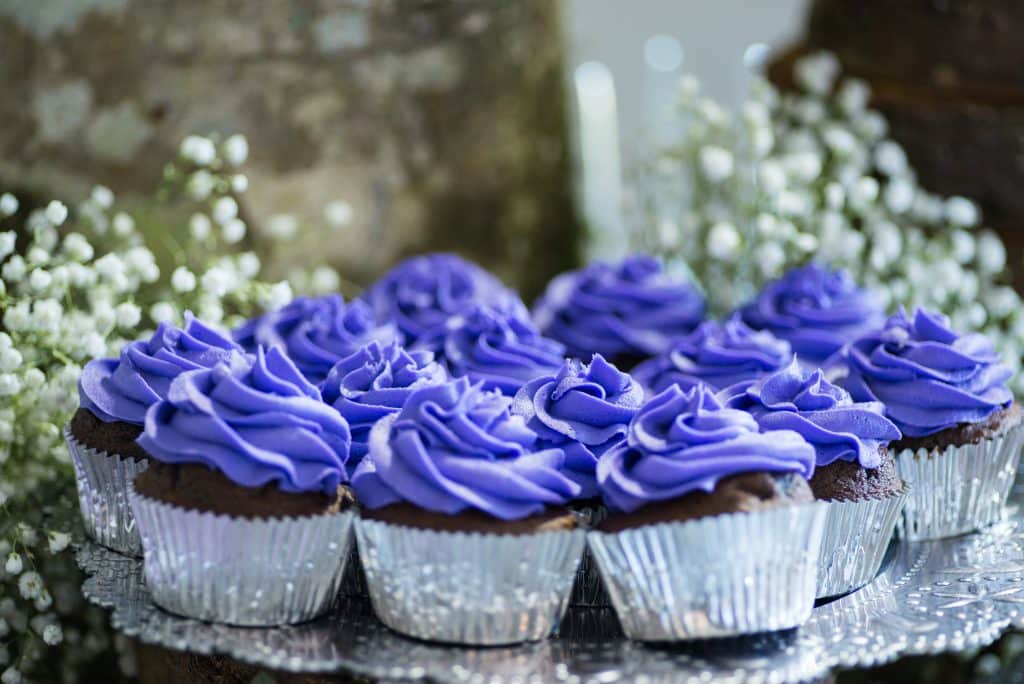
Next up, decorations! Decorations for a rustic themed wedding really are very simple. To complete this theme, use lots of wood, pallet boards, lanterns, mason jars, burlap, candles and lace. Popular right now are wood rounds for center pieces with mason jars or lanterns placed on top. Wrapping the mason jars with burlap, twine, vintage looking paper or lace adds an extra rustic feel and is fairly inexpensive to accomplish. Here are some photos of decoration ideas. If you have any questions on how to accomplish these looks feel free to ask me.
To wrap things up, once you choose your wedding theme, coordinating that theme throughout your wedding is really very simple. If you choose a floral theme, look for invitations with your favorite flowers on them, choose a long flowing dress, and bouquets of beautiful flowers. You could use flowers in your hair and have the pocket squares for the grooms be a fabric with an underlying flower texture. Use an arbor in the ceremony with flowers affixed to it and centerpieces with the same flowers arranged around candles or lanterns.
Some current trends in wedding themes are bohemian, floral, fantasy, fairy tale and rustic. If you search for these online you will find a many great ideas! But don't overwhelm yourself by trying to do everything you see, just pick and choose what you absolutely love. I really hope this helps you coordinate the wedding of your dreams. For ideas, suggestions or to hire me to help decorate your wedding, just contact me.
Coming Next Week: Wedding Memories: The art of creating a shadow box